
How an Epoxy River Dining Table is Crafted
Introduction
An Epoxy River Dining Table is far more than a practical piece of furniture; it embodies a captivating work of art that introduces a touch of nature’s sophistication into your dining area. If you’ve ever been entranced by the allure of a live edge epoxy dining table or fascinated by the intricate designs of resin river dining tables, you’ve arrived at the right destination. At Taitlin Studio, we specialize in handcrafting these remarkable custom table creations, blending the natural splendor of wood with the graceful allure of epoxy. This article will walk you through the intricate process of crafting an epoxy dining table, from handpicking the ideal slab of wood sourced from Canada to the final stages of design and finishing. Whether you’re an avid DIY enthusiast or simply intrigued by the artistry behind a resin dining table, this comprehensive exploration is bound to be both enlightening and motivational.
Choosing the Right Timber: Explore options such as white oak, ash, walnut, maple, or other unique wood selections.
Preparing the Wood Slab: Discover why tasks like flattening, cleaning, and pre-sealing are vital steps.
The Science of Epoxy: Gain insight into the various types and chemical interactions involved in the deep pour process.
Curing and Fluid Dynamics: Delve into the technical brilliance behind the creation of swirls and bubbles in the epoxy.
The Sanding Process: Learn the techniques for preparing the table to achieve a flawless finish.
Finishing with POLYX®–OIL: Experience the moment where the visual beauty of your table is finally unveiled.
Attaching the Legs: Add the finishing touch that breathes life into your dining table.
At Taitlin Studio, we craft custom epoxy river dining tables that merge artistry with functionality. Whether you’re searching for a statement piece for your dining room or a unique handcrafted table, explore our collections to find the perfect fit for your home:
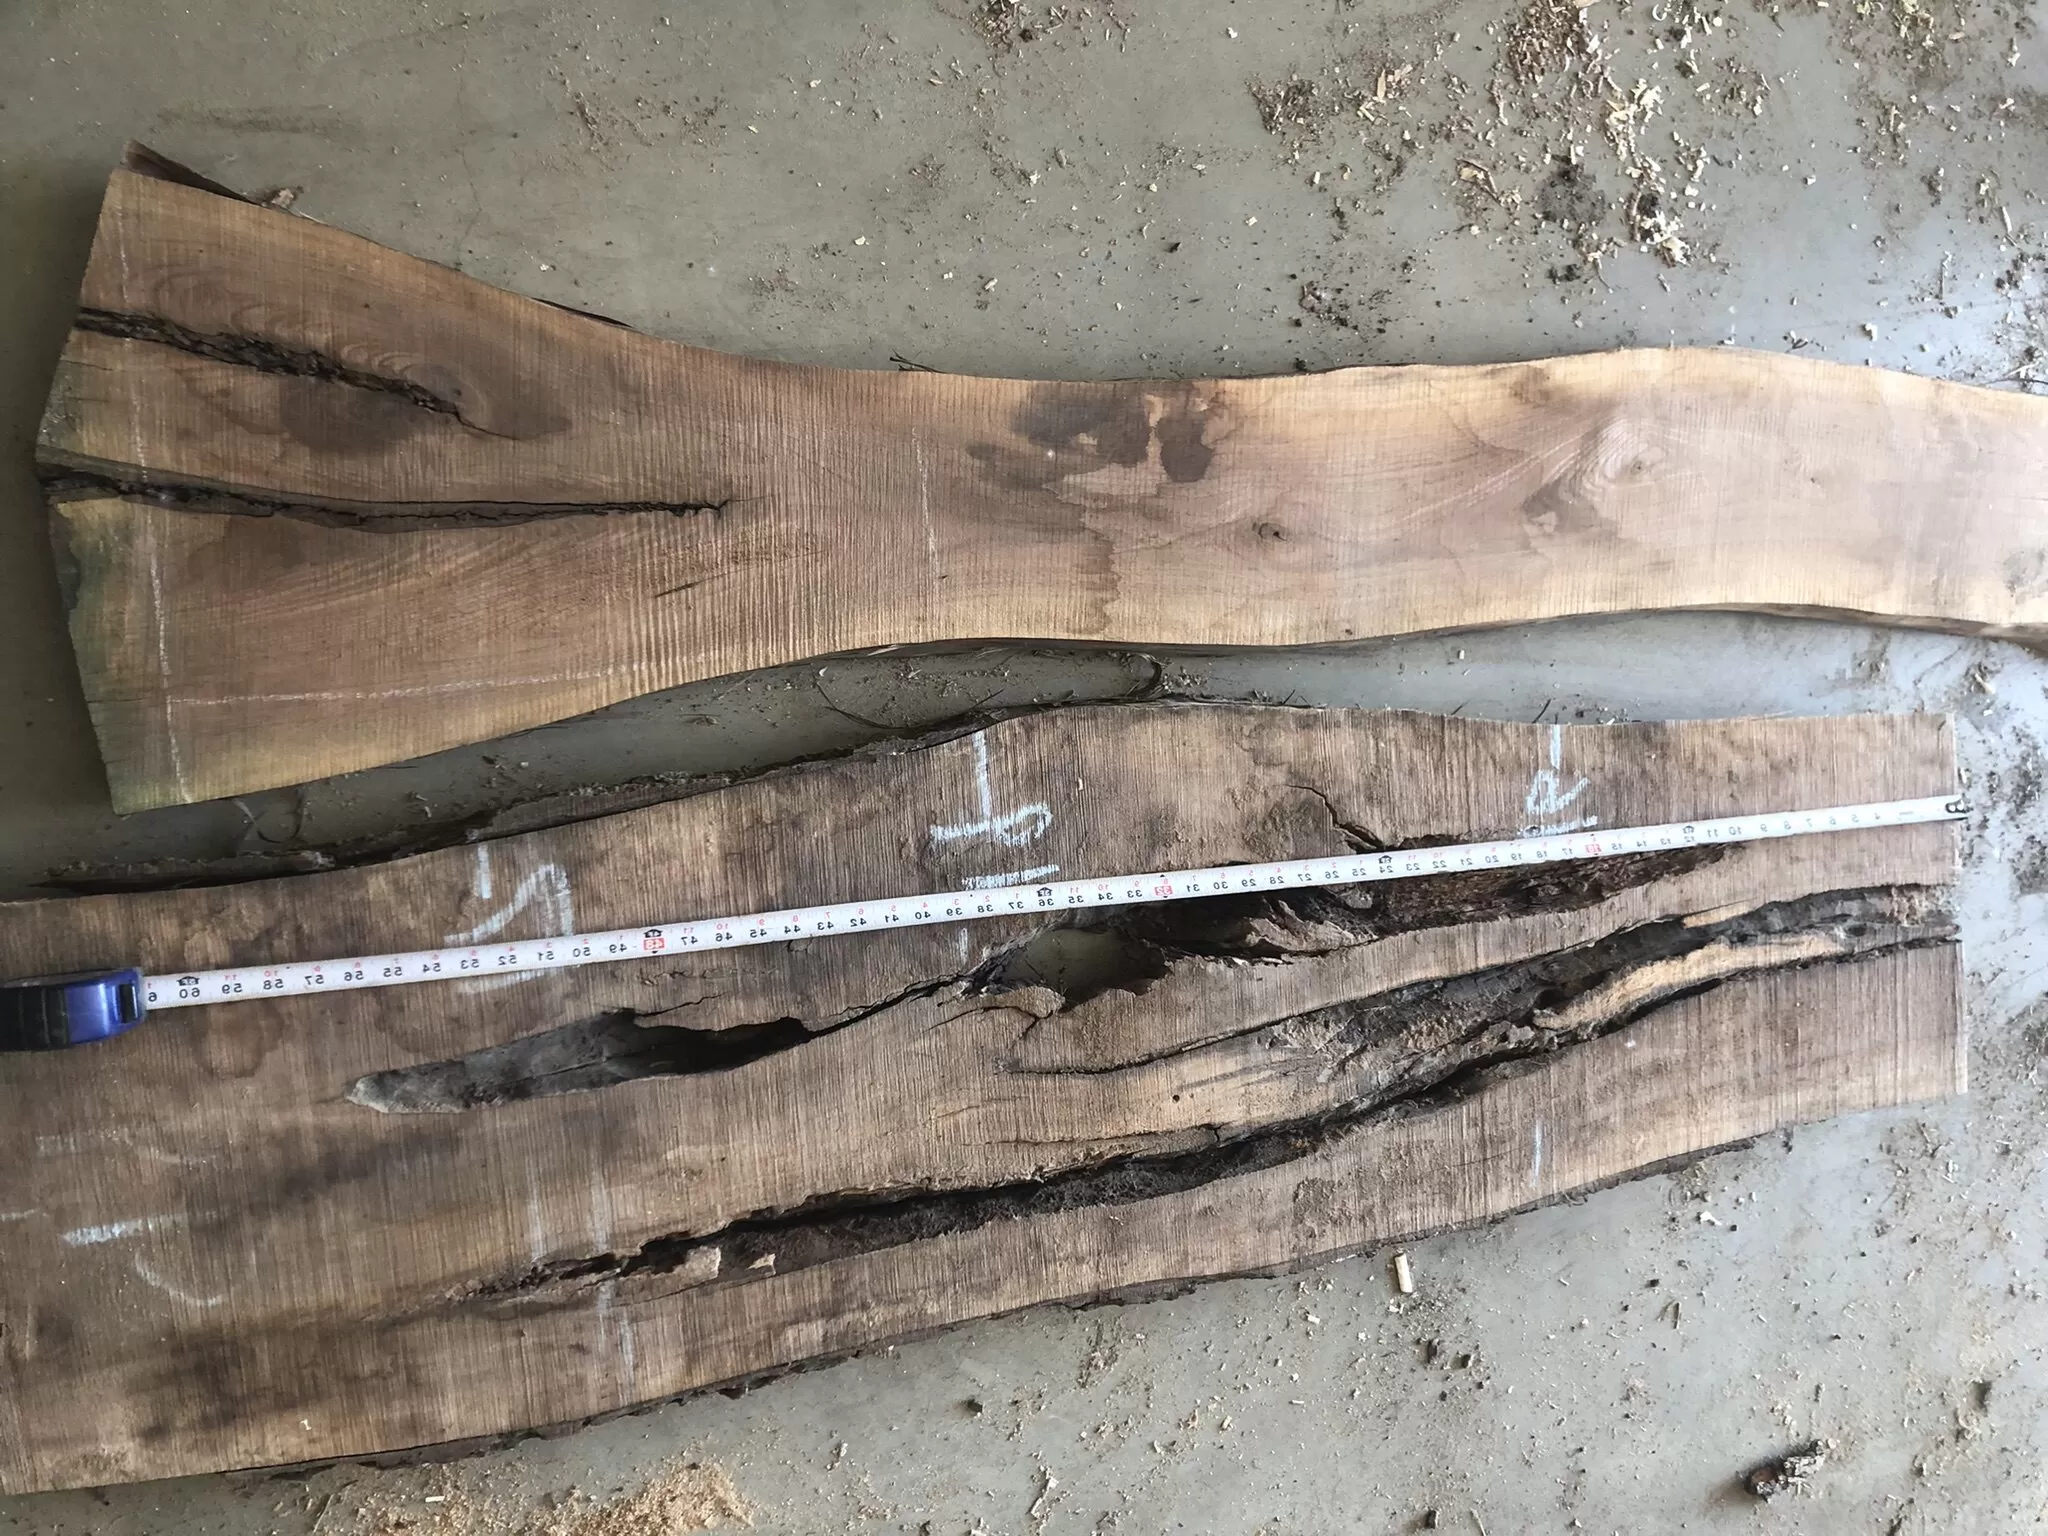
Step 1: Selecting the Perfect Slabs of Wood
Selecting the ideal wood slab marks the beginning of the epoxy river dining table journey, and it holds significant importance. At Taitlin Studio, we offer a range of wood options such as white oak, ash, walnut, and maple. We engage with our clients to understand their vision for their epoxy dining table, ensuring that the wood type harmonizes with their preferences. Whether you appreciate the rich grain of walnut or the light hues of ash, our collection caters to a diverse range of tastes.
The design layout of the dining table is another pivotal stage, presenting endless possibilities. Are you envisioning a straightforward river feature in the center? Or are you inclined towards a more intricate island-style design? Check out Pinterest for inspiration here. Your selected design will serve as a guiding beacon throughout the crafting process, so delve into the options and choose what resonates with you.
Step 2: Preparing the Wood Slab
Selecting and preparing the wood slab is a vital stage before advancing to the epoxy pour for your dining table. The condition of the slab often dictates the time and effort required for this process. Our skilled craftsmen excel at inspecting the wood to detect any flaws such as bark, voids, or compromised and soft wood. They meticulously attend to cleaning the fibers within knots and splits.
During this phase, tools like chisels, angle grinders, and rotary tools are utilized. These tools are used with precision to establish the ideal surface for the epoxy to bond effectively. The objective is clear yet crucial: establishing a sturdy base for the epoxy to ensure that your resin dining table or live edge epoxy dining table not only possesses visual appeal but also durability.
After the slab is meticulously prepped, the subsequent step involves sealing its edges and surfaces. This sealing process serves to prevent the colored epoxy from staining the wood upon pouring. When it comes to sealing, a tailored approach is adopted for each project, contemplating the use of either epoxy or shellac. This step transcends mere precaution; it offers an additional shield of protection, guaranteeing a smooth epoxy pour process and delivering breathtaking results.
Step 3: Building the Mold and Calculating Epoxy Volume
Crafting a mold is a critical phase in the creation of an epoxy river dining table. This process entails cutting laminate sheets to form the base and erecting walls around it. By fastening everything securely with screws and sealing the corners with silicone, we prevent any epoxy leakage. The mold serves as a containment vessel where the epoxy and wood slab will merge to bring to life the distinctive design you have envisioned.
The subsequent essential task involves accurately determining the volume of epoxy required for the pour. This calculation entails measuring the dining table’s length, width, and the voids designated for epoxy filling. It is a precise science aimed at upholding not just the visual appeal but also the structural stability of the dining table. In some instances, a single pour suffices, while in others, multiple pours may be necessary, depending on variables like ambient temperature and the total epoxy volume needed.
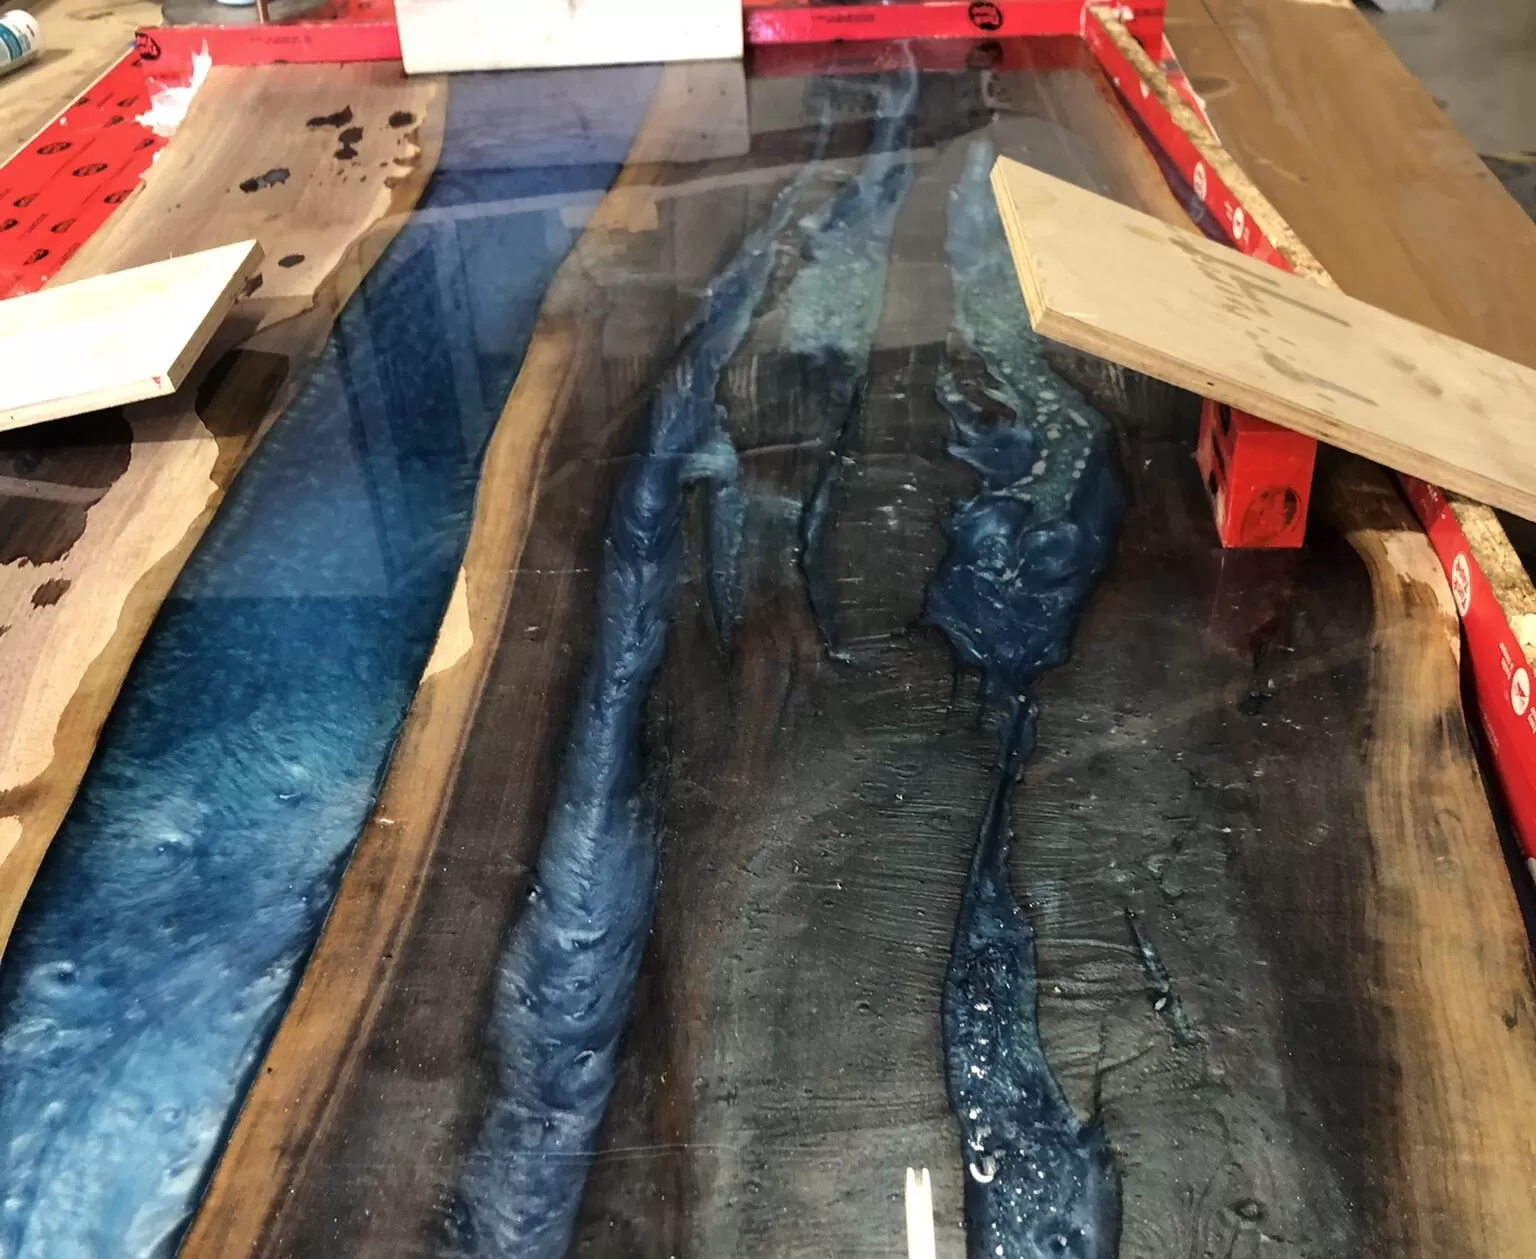
Step 4: The Science and Art of Curing the Epoxy
The curing process of epoxy for a dining table is a harmonious blend of artistic expression and scientific precision, intertwining aesthetics with chemical engineering. The typical curing period for deep pour epoxy ranges from 5 to 7 days, a timeframe influenced by the prevailing ambient temperature conditions. Throughout this stage, an exothermic chemical reaction unfolds, signifying that as the epoxy solidifies, it generates heat. We approach this phase with utmost seriousness, employing fans to foster optimal airflow and employing temperature control equipment such as thermometers or even thermal imaging tools to ensure a flawless curing process.
As the epoxy cures, temperature fluctuations prompt the fluid epoxy to shift, leading to the formation of bubbles and swirls in the final product. Rather than being perceived as imperfections, these elements are regarded as unique features, direct outcomes of the ongoing chemical reaction. The intricate interplay of fluid dynamics and thermal phenomena surprisingly gives rise to a form of natural artistry. The incorporation of mica colors in the epoxy further enhances this effect, endowing each dining table with an individualized touch of mastery.
To avert the potential risks associated with a “flash cure,” which could render the epoxy brittle, we vigilantly monitor the exothermic reaction. If temperatures escalate excessively, we implement temperature-regulating practices to ensure that the epoxy cures within an optimal environment. By skillfully balancing the realms of science and aesthetics, we guarantee that your epoxy river dining table not only boasts structural integrity but also embodies a masterpiece of artistry.
Step 5: Demolding, Trimming, Flattening, and the Detailed Work of Sanding
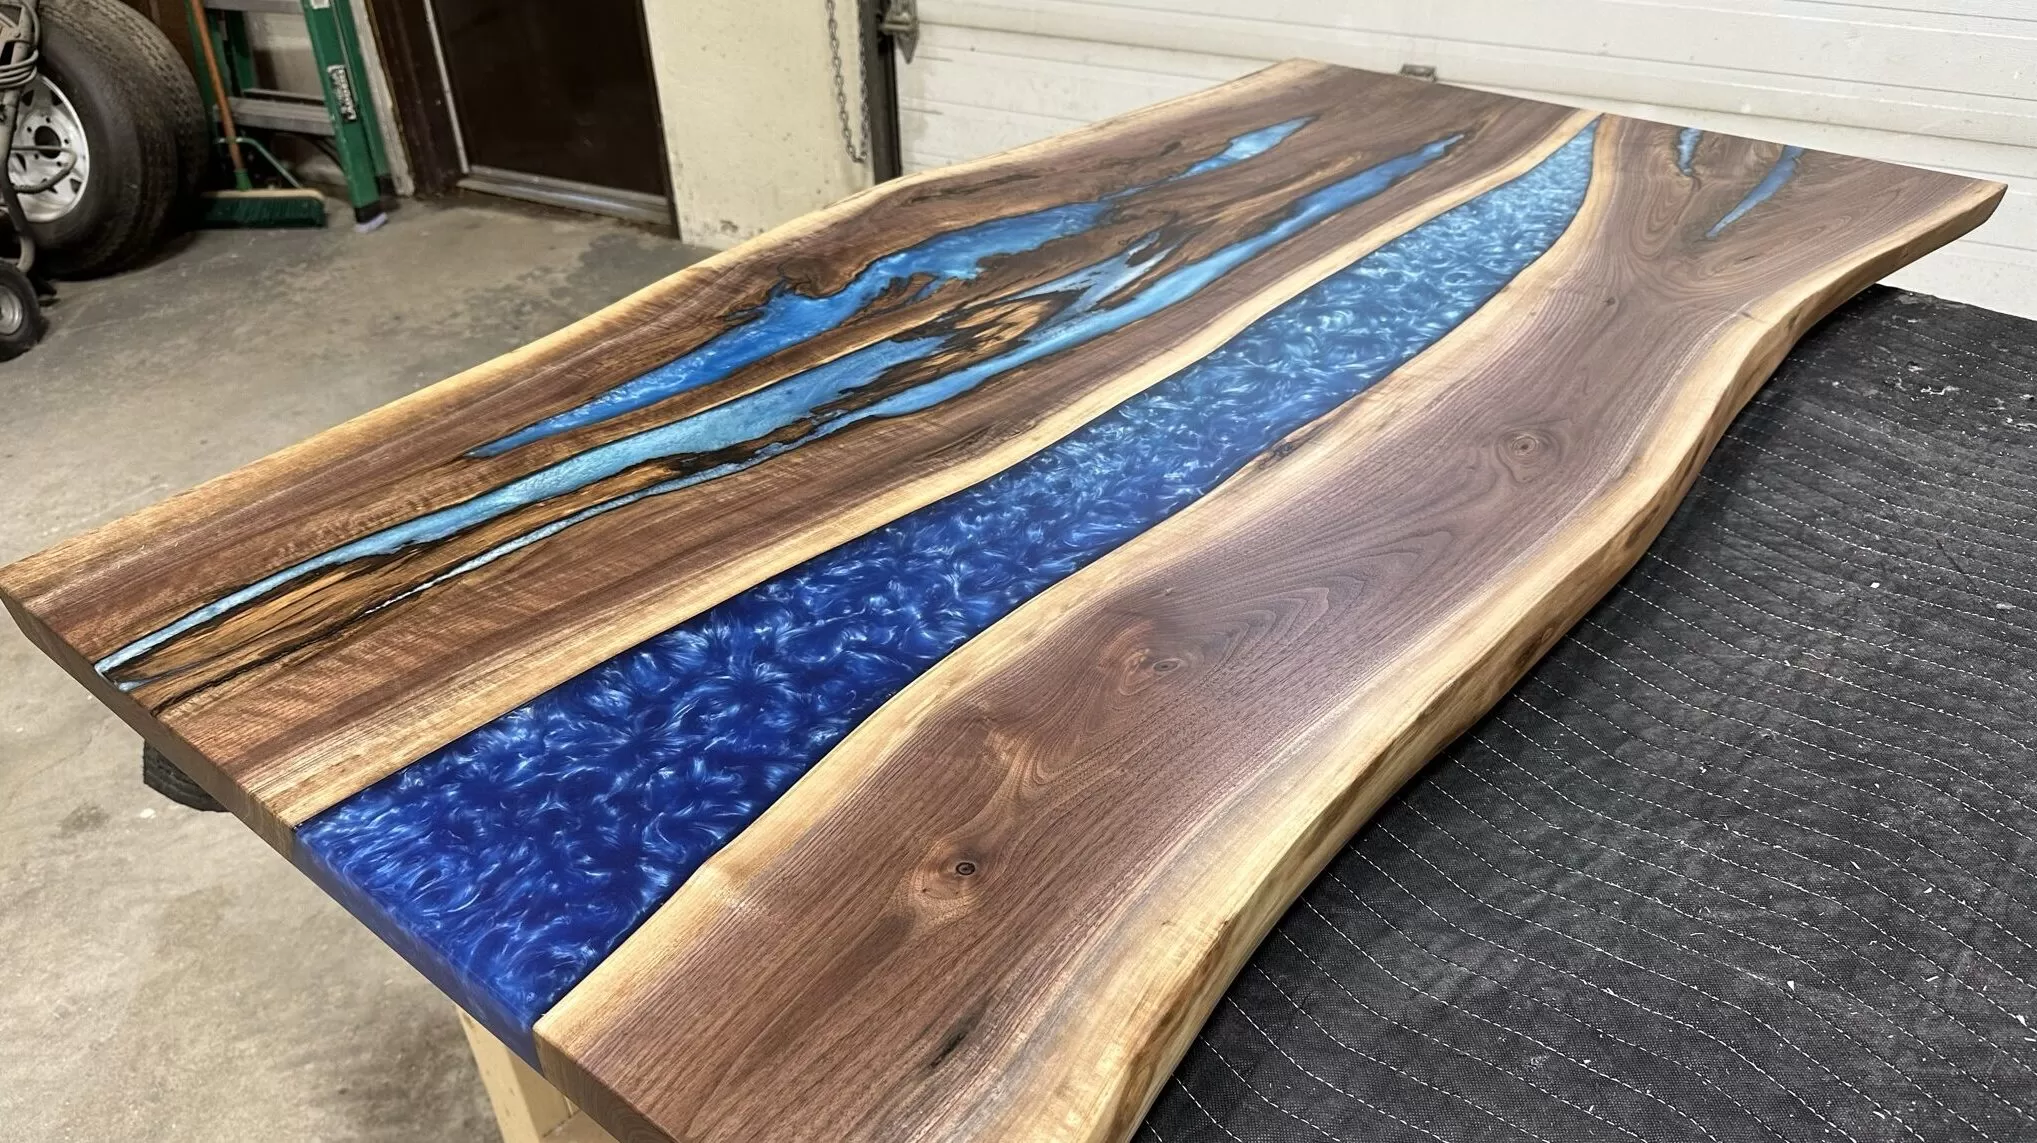
After the epoxy has completed its full curing cycle, we delicately extract the dining table from its mold and trim it to its ultimate dimensions. Subsequently, the table undergoes a secondary round of flattening to address any minor discrepancies that may have arisen during the curing phase, guaranteeing a flawlessly level surface primed for the ensuing finishing stages.
Following the flattening process, we progress to one of the most intricate segments of the procedure: sanding. This step transcends mere pursuit of a heightened sheen; it focuses on creating a meticulously smooth foundation for the dining table top. Commencing with a lower-grit sandpaper, we methodically advance to a higher grit, vigilantly inspecting for any tiny voids or air bubbles that may have surfaced. These minute imperfections are meticulously filled with epoxy to ensure a seamless surface. While the sanding process may be arduous, it establishes the groundwork for the striking, glass-like finish that distinguishes each of our epoxy river dining tables.
Step 6: The Grand Reveal: Where Beauty Unfolds
As we approach the finishing stage, this is the moment we’ve been working towards: the grand reveal where the beauty of our creation finally comes to life. Our preferred choice for this pivotal step is POLYX®–OIL. The application of this premium finish elevates the dining table’s inherent beauty while providing long-lasting protection. With careful precision in the application process, we witness the deep tones of the wood and the vibrant colors of the epoxy river table spring to life, affirming the dedication invested in the preceding stages. POLYX®–OIL not only enhances the aesthetic charm of your epoxy dining table but also shields it from the rigors of everyday use. Serving as the final flourish, it encapsulates weeks of artistry into a practical masterpiece.
The Final Touch: Attaching the Legs to Your Epoxy River Table
Once the finish has fully cured, the time has come to affix the legs to the dining table, transforming it into a fully functional furniture piece. Whether opting for steel legs from our diverse collection or opting for custom-crafted wood legs, the decision rests in your hands. The meticulous attachment of the legs ensures both stability and harmonious integration with the overall design of the table. This pivotal stage marks the transition of the dining table from a project to a finished work of art, poised to grace your home.
Conclusion
Embarking on the creation of an epoxy river dining table is a nuanced yet gratifying journey that harmonizes artistic vision with scientific precision, merging form and function seamlessly. From handpicking the perfect wood slab to mastering the of epoxy curing and finishing, each phase plays a pivotal role in achieving that flawless final product. Your dining table transcends mere furniture; it stands as a testament to exquisite craftsmanship, poised to endure for generations with proper care.
For further insights into wooden dining tables,
- Customizing Your Dining Table: Length and Width Explained
- The Ultimate Guide to Wooden Table Care
- The Art of Handcrafted Tables: Why It Matters
We hope you enjoyed learning about the making of an epoxy river dining table. Thank you for journeying with us through the intricate process that transforms raw materials into a beautiful, lasting piece of furniture.